Navigation
- Home
- News
- Download
- System Requirements
- Packages
- Screenshots
- Changelog
- Using Live CD/DVD
- FAQ
- Limitations
- Publications
- License
- Credits & Copyrights
- Support SLAMPP
- Get Customized!
- Contact
- Bugs and Solutions
- How To
Become a fan
SLAMPP Live CD/DVDFeatured Links
- Kernel.org
- Slackware Linux
- Zenwalk Linux
- SLAX
- Linux Live
- DistroWatch.com
- SLAMPP Blog
- Old SLAMPP Wiki
- Brainmatics
Support

Tips and Tricks
This section is quite long and contains the following sections:
1. Accessing Featured Applications on SLAMPP.
2. Cloning a LiveDVD to preserve changes.
3. Simple SAMBA Share Configuration.
4. Login to SLAMPP in Text Mode.
5. Starting PostgreSQL Server.
6. Install SLAMPP to a Hard Drive.
7. Frugal SLAMPP installation on CLI
#1 Accessing Featured Applications on SLAMPP
Questions keep coming up as to how to find the hard disk installer, how to make live clone from current SLAMPP Live CD/DVD, and other alike questions that might arise during usage, here is a list of several featured applications on SLAMPP 2.0.x that do the job.:
GUI Applications
- Control Panel - All system applications that configure how SLAMPP behaves are found here.
- ZenInstaller - SLAMPP installation program. It can install SLAMPP on hard disk permanently.
- LiveClone - To make live CD/DVD or live USB of running SLAMPP.
- Lilofix - To install LILO (Linux boot lNetoader).
- Netpkg - To install/remove applications and their dependencies on SLAMPP using Zenwalk online repositories.
- xkernelconf or Kernel Modules - To activate/deactivate kernel modules you want.
- Startup Services - To activate/deactivate services on SLAMPP during boot process.
- Disk Manager - To manage disk partitions found on your hard disk/removable media.
FYI, all of GUI applications are reachable through System menu.
CLI Applications
- When you have problem with your X configuration, run # videoconfig on terminal.
- To set your network configuration, run # netconfig.
- To check services currently running on SLAMPP, run # nmap localhost.
- To manage users and groups, run # userconfig.
#2 Cloning a LiveDVD to preserve changes
Please follow the following instructions:
- Boot from the LiveDVD. Make sure you have available a >4GB space that can be mounted to build the new LiveCD in.
- Install/remove/configure everything you want to include in the new LiveDVD. Make sure everything is working well.
- Open a terminal session as root and run liveclone. A GUI will open that is self explanatory in its operation.
- When the process finishes (and it will take some time), burn the new LiveDVD from the iso created.
- Try your new LiveDVD.
#3 Simple SAMBA Share Configuration
This configuration file, found at /etc/samba as smb.conf can be used to create a simple share at /mnt/share. You may want to backup the current smb.conf file before creating this one:
smb.conf
# smb.conf # Samba config file
# Date: 2009/08/04 13:53:01
[global]
workgroup = MYGROUP
server string = SLAMPP Samba Server
security = SHARE
log file = /var/log/samba.%m
max log size = 50
dns proxy = No
[homes]
comment = Home Directories
read only = No
[printers]
comment = All Printers
path = /var/spool/samba
printable = Yes
browseable = No
[images]
path = /mnt/share
public = yes
browseable = yes
writeable = yes
create mask = 0664
directory mask = 0775
#4 Login to SLAMPP in Text Mode
Instead of directly logging in using graphical login manager as set by default, you can also login to SLAMPP through Text mode or command line interface. The easy way to do that is like this:
- When the boot menu of SLAMPP appears at the first time, click on Tab key to have the boot parameters displayed.
- Replace the last boot parameter, autologin, with, init 3. Press Enter.
- Wait for a while until the whole boot process is completed, and then you will get the command prompt to login manually. Type root as username and slampp as password.
- Just in case you have problem with the display, try to reconfigure your X-server configuration, by running # videoconfig. Type # startx once it's done.
#5 Starting PostgreSQL Server.
The PostgreSQL server service is not started by default in SLAMPP:
- You must first make the /etc/rc.d/rc.postgresql executable.
- Open a terminal session.
- cd to the /etc/rc.d directory and issued a chmod 755 rc.postgresql command.
- While in the /etc/rc.d directory, you can start postgreSQL with ./postgresql start.
#6 Install SLAMPP to a Hard Drive
The procedure for doing this is quite straight forward and detailed in this section.
- Before we start, please prepare at least two new partitions using Gparted. One for swap and another for root (/) directory. To have all SLAMPP files on your harddisk, the root partition must have free space at least 7 GB and xfs formatted. And then, set swap space partition twice of your physical memory. (eg. your RAM 512 MB, swap 1024 MB).
- When done with the HD preparation, from the system menu, select the ZenInstaller.

- Step 1 is to select the main or root partition for the installation. This partition must exist before installing.

- Step 2 provides for expert mode in adding other partitions as specific mount points other than root.

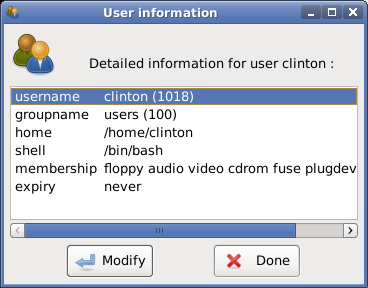
- Step 3 is to create at least one non-root user and set the passwords for both the non-root and root users.
- Start by pressing on “Create new user.”


- Accept the defaults on the following screens: Group Name, Home Directory, Group Membership and Shell.


- Click on Never on the Expiry screen unless you want the created user to exire.
- Note: Password entry is double entry for confirmation and can be entered in either clear text mode or hidden mode.
- At the conclusion of the entering the user information, a summary information screen is presented.
- Make sure you "Change the Root Password" before moving on to the Launch Installation tab.
- Click on Launch Installation and the following "Confirmation" screen.


- Next Step is to Launch LiloFix to install & Configure the Lilo loader.

- Select an availale partition and enter an Menu entry for the SLAMPP system.
- Note: No spaces or punctuation marks are allowed in the menu entry.
- Press the + button before pressing Excute to start the Lilo installation.
- Confirm on the following screen and wait for completion, Press OK.


- Installation is finished. Logout of the LiveDVD, reboot being sure to removed the LiveDVD, and run from the Hard Disk.
#7 Frugal SLAMPP installation on CLI
Sometimes you wonder what exactly happens when you install SLAMPP through ZenInstaller application. Or, somehow that application is not working properly on your PC. What would you do? Actually there is nothing complicated around it. Anybody could easily do the job like an expert. Just follow the following instructions. As usual, please take all actions cautiously.
- Before we start, please prepare at least two new partitions using Gparted. One for swap and another for root (/) directory. To have all SLAMPP files on your harddisk, the root partition must have free space at least 7 GB and xfs formatted. And then, set swap space partition twice of your physical memory. (eg. your RAM 512 MB, swap 1024 MB).
- Done with the preparation, open a terminal/console, and copy paste the following commands. We assume /mnt/sda3 is the new root partition created before.
- We chroot to our working directory, /mnt/sda3, and set a simple LILO configuration for SLAMPP
- You can also edit the /etc/lilo.conf file manually and copy paste the following simple configuration.
- Run # lilo -v to activate the new LILO configuration.
- Type # exit to logout from chrooted environment and back to working Live CD/DVD. SLAMPP is now already installed on your harddisk.
- Done and reboot your PC. Good luck!
# cp --preserve -rf /{bin,command,dev,etc,home,images,lib,opt,package,root,sbin,service,srv,usr,var} /mnt/sda3
# mkdir /mnt/sda3/{boot,media,mnt,proc,sys,tmp}
# cp /boot/vmlinuz /mnt/sda3/boot
# cp -rf /usr/share/zenlive/revert2zw/* /mnt/sda3
# mount -t proc proc /mnt/sda3/proc
# mount –bind /dev /mnt/sda3/dev
# chroot /mnt/sda3
# liloconfig
boot = /dev/sda
prompt
timeout = 300
vga=791
image = /boot/vmlinuz
root = /dev/sda3
label = SLAMPP
read-write
other = /dev/sda1
label = Windows
table = /dev/sda